How to build a helicopter at home? This article is strictly for helicopter enthusiasts and we will share with you what we know about building one. Have you ever considered building a helicopter? While it may sound daunting.
Building a helicopter at home can be a rewarding experience for those with a passion for engineering and aviation. In this article, we’ll take you through the basic steps involved in building your very own helicopter.
Firstly, it’s important to understand that building a helicopter requires a great deal of skill and patience. You’ll need to have a strong understanding of aerodynamics, mechanics, and electrical systems.
You’ll also need to be comfortable working with tools such as welders, grinders, and saws. But don’t let this deter you! With the right guidance and resources, building a helicopter can be a fulfilling project that will leave you with a one-of-a-kind creation.
In this article, we’ll cover everything from selecting the right materials and tools to building the airframe and installing the engine. We’ll also delve into the regulations and safety considerations involved in flying a home-built helicopter.
So, whether you’re an experienced builder or a beginner looking for a challenge, let’s get started on your journey to building a helicopter at home.
How to build a helicopter at home?
Building a helicopter at home may seem like a daunting task, but with proper planning and execution, it can be done. The first step is to gather all the necessary materials and tools, including the frame, engine, rotors, and control systems.
Next, it’s crucial to research and understand the aerodynamics and mechanics of helicopters to ensure the design is safe and functional.
One important aspect is the main rotor system, which generates lift and thrust. This includes the rotor blades, hub, and mast. The tail rotor system, which provides stability and directional control, is also essential.
Other components that need to be considered include the transmission system, which transfers power from the engine to the rotor, and the fuel and electrical systems.
Building a helicopter at home requires advanced knowledge of engineering and mechanics, as well as a significant investment of time and money.
It’s important to consult with experts in the field and follow safety guidelines to ensure a successful build. With dedication and patience, the end result can be a unique and rewarding accomplishment.
Also see: Why Gyrocopter Kits Are the Future of Personal Aviation
1. The thrill of flying a helicopter
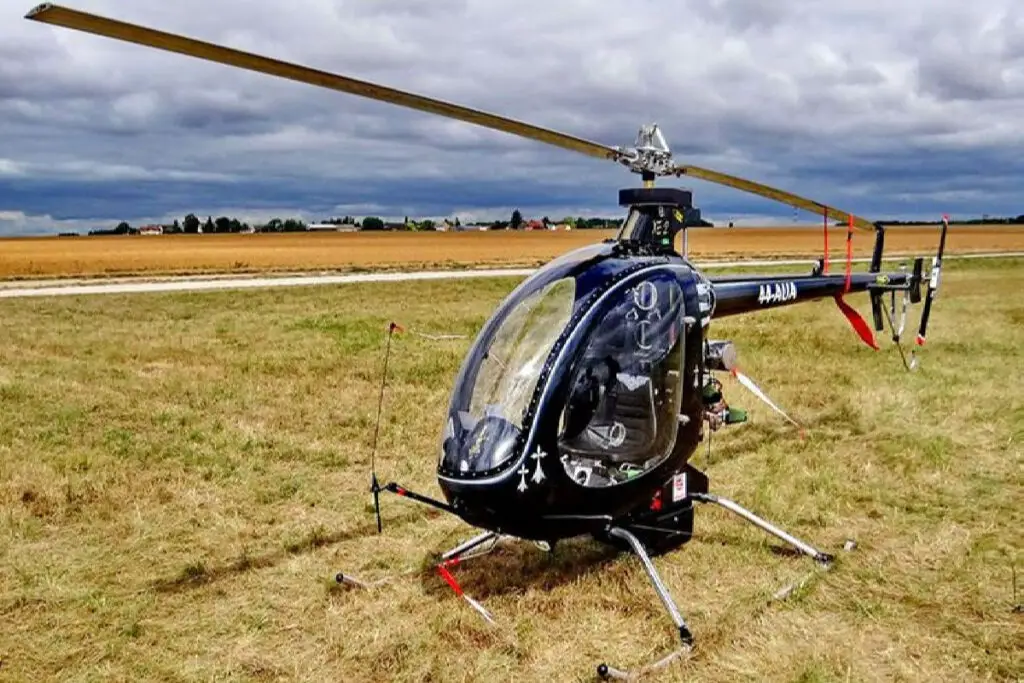
Flying a helicopter is an exhilarating experience that can provide a unique sense of freedom and control. Unlike an airplane, a helicopter can take off and land vertically, fly backwards, and hover in one place.
It can reach areas that airplanes cannot, making it a popular choice for search and rescue missions, aerial photography, and transportation. Imagine having the ability to fly your own helicopter that you built yourself. The sense of achievement and excitement that comes from flying your own creation is unparalleled.
2. The challenge of building a helicopter at home
Building a helicopter at home is not an easy task. It requires a significant amount of time, effort, and dedication. You must have a thorough understanding of the principles of helicopter flight, aerodynamics, and design.
You must also have access to the right tools, materials, and resources. It is not a project that can be completed overnight, but with patience and perseverance, it is possible to build a homemade helicopter that is safe, reliable, and functional.
Building a helicopter at home is a challenge that only a few individuals dare to undertake. It requires a lot of patience, skill, and knowledge to create a flying machine that can safely take to the skies.
The first thing you need to do when building a helicopter is to research the different types of helicopters available, such as the Bell 47, Sikorsky S-52, or Robinson R22. You must also consider the purpose of the helicopter, whether it’s for personal use or commercial purposes.
Once you have chosen the type of helicopter you want to build, you must acquire the necessary parts and tools. This can be a time-consuming process, as some parts may be challenging to find.
You will also need to have a good understanding of aerodynamics, mechanics, and electronics to assemble the helicopter correctly.
One of the most significant challenges in building a helicopter at home is obtaining the necessary certifications and licenses.
The Federal Aviation Administration (FAA) has strict regulations and requirements for anyone who wants to build and fly their helicopter. You must ensure that your helicopter meets all safety and performance standards before you can fly it.
Despite the challenges, building a helicopter at home can be a rewarding experience. It allows you to create a custom machine that suits your needs and desires.
However, it requires a significant amount of time, dedication, and resources. If you are up for the challenge, building a helicopter can be a fulfilling and exciting endeavor.
Also see: The Benefits of Building Your Own Gyrocopter Kit
3. Benefits of building a homemade helicopter
Building a homemade helicopter can be a fascinating and rewarding project for those who enjoy tinkering with machinery. The process of constructing a helicopter from scratch can be a great learning experience.
Allowing you to gain knowledge of aerodynamics, mechanics, and engineering principles. It can also be a fulfilling challenge that will test your problem-solving skills and creativity.
One of the most significant benefits of building a homemade helicopter is the cost savings. Purchasing a ready-made helicopter can be quite expensive, while building one yourself can be significantly cheaper.
Furthermore, you can customize your homemade helicopter to meet your specific needs and preferences. Another advantage of building a homemade helicopter is the sense of accomplishment you will feel when you finally take to the skies in your creation.
Flying a helicopter that you built with your own hands can be a truly exhilarating experience. While building a homemade helicopter can be a challenging project, the benefits are numerous.
It can provide you with a new hobby, help you learn new skills, and give you a sense of pride in your accomplishments. So why not give it a try?
4. Understanding the basics of helicopter design
Before beginning your helicopter building project, it is important to have a basic understanding of helicopter design. A helicopter is an aircraft that uses rotating blades to generate lift and propulsion.
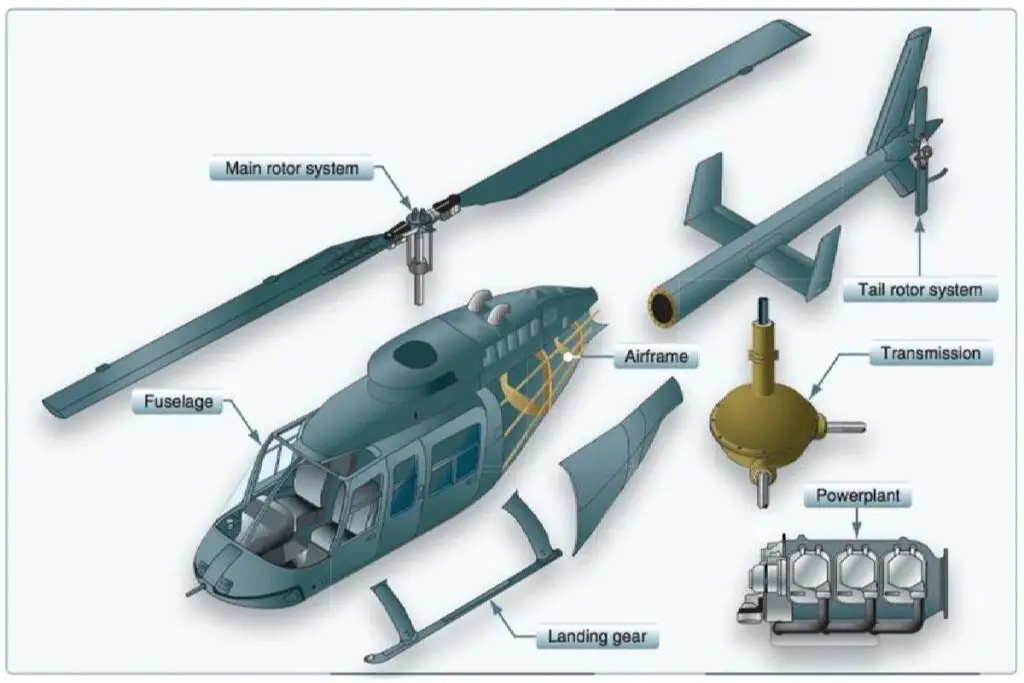
It consists of several main components, including the fuselage, rotor system, landing gear, cockpit, engine, transmission system, fuel system, and electrical system. Each component plays a critical role in the helicopter’s functionality and performance.
Helicopter rotor blades are a crucial component of the aircraft’s lift and stability. It’s a common misconception that the number of rotor blades alone determines the lift generated by a helicopter.
While it’s true that increasing the number of blades can enhance lift to a certain extent, it’s not the only factor. The higher the number of helicopter rotor blades, the greater the lift generated due to the increase in the blade’s surface area.
However, more blades can also lead to increased drag, reducing the overall efficiency of the helicopter. Moreover, the weight of additional blades can decrease the helicopter’s maneuverability and speed.
Engineers balance the number of blades with the weight and design of the helicopter to optimize performance. Helicopters with fewer blades, like two-blade designs, are common for their agility and speed, while multi-blade designs are prevalent in heavy-lift applications.
In summary, the number of rotor blades is just one factor in a complex system of design trade-offs to achieve optimal helicopter performance.
Also see: Homebuilt Helicopter Kit
5. The components of a helicopter
As previously mentioned, a helicopter consists of several main components. The fuselage is the main body of the helicopter and provides housing for the cockpit, engine, transmission system, and other components.
The rotor system consists of rotor blades, a rotor hub, and rotor controls, and is responsible for generating lift and propulsion. The landing gear supports the weight of the helicopter during takeoff and landing.
The cockpit houses the pilot and control systems. The engine and transmission system provide power to the rotor system, while the fuel system provides fuel to the engine. The electrical system provides power to the various electronic components of the helicopter.
6. Principles of helicopter flight
To understand the principles of helicopter flight, it is important to understand the concept of lift and propulsion. Lift is generated by the rotor blades as they rotate, creating a difference in air pressure above and below the blade.
Propulsion is generated by the angle of the rotor blades, which creates forward or backward motion. The pilot controls the helicopter’s flight by adjusting the angle of the rotor blades and the speed of rotation.
Principles of helicopter flight involve understanding the physics of rotary-wing aircraft. The four main forces that affect helicopter flight are lift, weight, thrust, and drag.
The rotor blades of a helicopter generate lift, which is the force that keeps the aircraft in the air. The weight of the helicopter and its occupants must be balanced by the lift generated by the rotors.
Thrust is the force that propels the helicopter forward or backward, while drag is the force that opposes this motion.
Helicopters are able to hover in one place, fly forward or backward, and even move sideways or diagonally. This is possible due to the swashplate mechanism that controls the pitch of the rotor blades.
By changing the pitch of the blades, the lift generated by the rotor can be increased or decreased, allowing the helicopter to perform various maneuvers. Additionally, helicopter pilots must be aware of the dangers of retreating blade stall and ground effect.
A retracted blade stall occurs when the airflow over the retreating blade of the rotor becomes disrupted, reducing lift and potentially causing a loss of control.
Ground effect is the phenomenon where the rotor downwash is deflected by the ground, resulting in an increase in lift and a reduction in drag. In summary, understanding the principles of helicopter flight is essential for the safe and efficient operation of these unique aircraft.
7. Understanding helicopter aerodynamics
Aerodynamics is the study of the forces that act on objects as they move through the air. Understanding aerodynamics is critical in designing a safe and efficient helicopter.
Factors such as the shape of the rotor blades, the angle of attack, and the speed of rotation all play a role in the aerodynamics of a helicopter. The shape of the rotor blades can affect lift, drag, and noise.
The angle of attack, or the angle at which the rotor blades meet the air, is important for generating lift and propulsion. The speed of rotation can affect the amount of lift and propulsion generated.
Also see: How Much Does It Cost To Build A Helicopter?
8. Choosing the right materials for your homemade helicopter
Choosing the right materials for your homemade helicopter is important for ensuring its safety and reliability. Materials should be lightweight yet strong enough to withstand the stresses of flight.
Common materials used in helicopter construction include aluminum, titanium, and composites such as fiberglass and carbon fiber.
When it comes to building a homemade helicopter, choosing the right materials is crucial. The first thing to consider is the framework, which should be made of a strong and lightweight material such as carbon fiber or aluminum.
The rotor blades should be made of high-quality materials that can withstand the stresses of flight, such as composite materials like fiberglass or Kevlar.
Other key materials to consider include the engine, fuel system, and transmission. The engine should be powerful enough to lift the weight of the helicopter and should be made of durable materials such as aluminum or titanium.
The fuel system should be designed to provide a steady flow of fuel to the engine and should be made of materials that are resistant to corrosion and wear, such as stainless steel or brass.
The transmission is another important component, as it transfers power from the engine to the rotor blades. It should be made of high-strength materials such as steel or titanium and be designed to minimize friction and wear.
It’s important to choose the right electrical components, such as wiring and connectors, to ensure that the helicopter’s systems operate smoothly and safely.
High-quality materials, such as copper or gold-plated connectors, can help ensure reliable operation. Choosing the right materials for a homemade helicopter is critical for safety and performance.
By selecting high-quality materials that are strong, lightweight, and resistant to wear and corrosion, builders can create a helicopter that is both efficient and reliable.
9. Basic tools and equipment needed
Building a homemade helicopter is an exciting and challenging endeavor that requires a wide range of basic tools and equipment to ensure success.
The first step is to gather all the necessary tools and equipment, including hand tools such as wrenches, screwdrivers, and pliers, as well as power tools like a drill press, circular saw, and angle grinder.
Other essential equipment includes a welder, an air compressor, and an assortment of nuts, bolts, and screws. A helicopter kit may also be needed, which typically includes the rotor blades, frame, and engine.
When building a homemade helicopter, safety is paramount. Personal protective equipment, such as safety goggles, gloves, and ear protection, must be worn at all times. A fire extinguisher and first aid kit should also be on hand.
To construct the helicopter, it is necessary to understand the principles of aerodynamics and the dynamics of flight. This includes understanding how to balance the helicopter and ensure its stability.
A flight simulator may be a useful tool for testing and adjusting the helicopter’s controls. Overall, building a homemade helicopter requires a significant investment of time, effort, and resources.
With the right tools, equipment, and knowledge, however, it is possible to create a functional and rewarding aircraft that can provide hours of exhilarating flight.
Also see: Home Built Helicopters
10. Planning and designing your homemade helicopter
Designing and building your own homemade helicopter can be a challenging but rewarding experience. Before beginning, it’s important to plan and prepare for the project to ensure success.
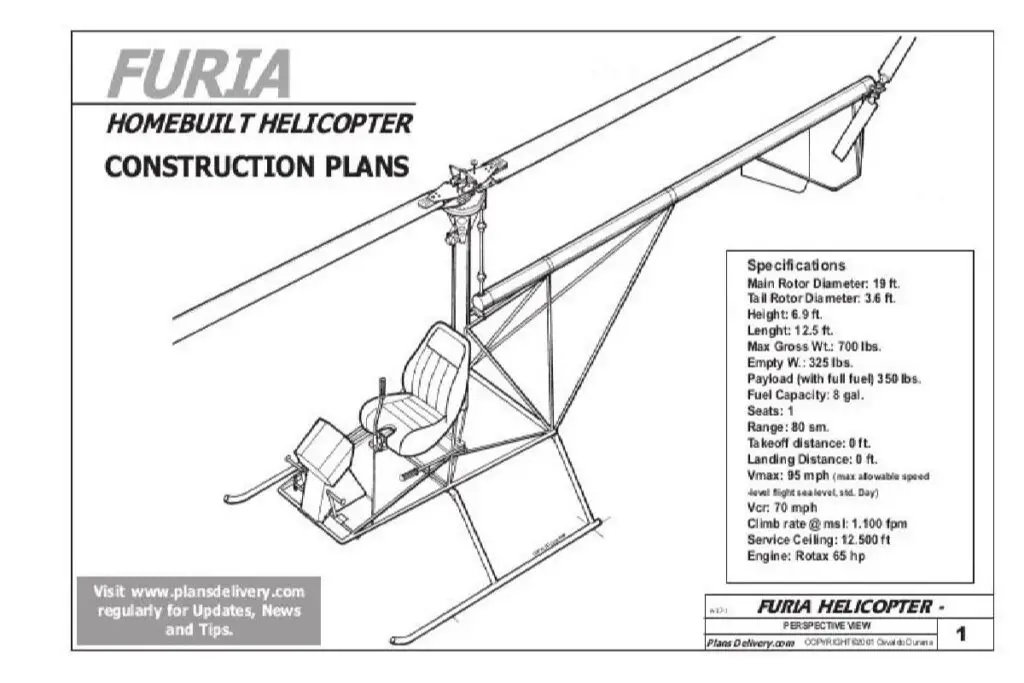
Firstly, research and gather information on the different types of helicopters and their components. Look into the design and construction of the main rotor, tail rotor, transmission, and engine.
This will give you an understanding of the technical requirements and limitations of the project. Next, create a detailed blueprint of your helicopter, taking into account the size, weight, and balance of the aircraft.
Consider the materials you will use, such as aluminum, titanium, or carbon fiber, and their availability and cost.
When it comes to the rotor system, choose between a single main rotor or a coaxial system, which consists of two rotors on top of each other. The latter provides better stability and control but requires more complex design and construction.
It’s also important to consult with experts and experienced builders to ensure safety and compliance with aviation regulations. Make sure to test and refine the design in a controlled environment before attempting to fly.
Overall, designing and building a homemade helicopter requires careful planning and attention to detail. With patience and persistence, you can create a unique and functional aircraft that can provide a sense of accomplishment and excitement.
11. Building the helicopter fuselage
The fuselage is the main body of the helicopter and provides housing for the cockpit, engine, transmission system, and other components. To build the fuselage.
You will need to create a framework using metal tubing or other materials. You will then need to cover the framework with a skin made of aluminum, fiberglass, or other materials.
Building the helicopter fuselage involves the careful assembly of various components to create a sturdy and aerodynamic structure that houses the main rotor, tail rotor, and engine.
The process begins with the fabrication of the frame, which is made from aluminum, titanium, or composite materials. The frame is designed to provide the necessary strength and rigidity to support the weight of the entire helicopter.
Once the frame is complete, the skin is attached. The skin is typically made from lightweight materials such as fiberglass, carbon fiber, or Kevlar.
The skin is molded to fit the shape of the frame and provides a smooth, aerodynamic surface for the helicopter to glide through the air. The next step in building the helicopter fuselage is the installation of the cockpit, which includes the instrument panel, seats, and controls.
The cockpit is designed to provide a comfortable and functional space for the pilot and any passengers.
Finally, the various subsystems of the helicopter are installed, including the engine, rotor system, and avionics. These subsystems are connected to the cockpit and are carefully integrated to ensure optimal performance.
In summary, building the helicopter fuselage is a complex process that requires skilled craftsmanship and attention to detail.
From the frame to the cockpit to the subsystems, every component must be carefully designed and assembled to create a safe and reliable aircraft.

12. Installing the helicopter rotor system
Installing the rotor system of a home-built helicopter can seem like a daunting task for many enthusiasts who want to take on the challenge of building their own flying machine.
However, with the right knowledge and equipment, it can be a rewarding experience. The first step is to determine the type of rotor system that will be used.
There are two main types: the conventional single rotor system and the more complex coaxial rotor system. Once this is decided, the rotor hub and blades can be assembled. This involves attaching the blades to the hub and ensuring that they are balanced correctly.
Next, the mast and rotor head assembly can be installed. The mast is the vertical component that supports the rotor system, and the rotor head is the component that allows the rotor to spin.
It is important to ensure that the mast is level and straight and that the rotor head is properly aligned. After the mast and rotor head are installed, the control system can be connected.
This involves connecting the swashplate, which is responsible for controlling the pitch of the rotor blades, to the control sticks in the cockpit. The collective control, which is responsible for controlling the overall lift of the helicopter, is also connected.
Finally, the tail rotor system can be installed. This system is responsible for providing directional control and stability to the helicopter. Once everything is connected, it is important to perform a thorough check of the rotor system before taking to the skies.
Installing the rotor system of a home-built helicopter requires careful planning, attention to detail, and a thorough understanding of the components involved. With these steps in mind, enthusiasts can build a safe and reliable helicopter that they can be proud of.
Also see: How To Build A Helicopter At Home?
13. Building the helicopter Cockpit
Building the Cockpit of a home built helicopter is an intricate process that requires skill and precision. The cockpit is the heart of the helicopter, where the pilot controls the aircraft and navigates through the air.
It is essential to design and construct the cockpit with the utmost attention to detail and safety.
The first step in building the cockpit is to determine the layout of the controls and instruments. This involves selecting the appropriate gauges, switches, and controls for the aircraft.
Once the layout is established, the cockpit frame can be constructed using lightweight materials such as aluminum or carbon fiber.
Next, the cockpit panels can be installed, which will house the gauges, switches, and controls. The panels need to be carefully cut and fitted to ensure a precise fit. Wiring and electrical components can then be installed to connect the instruments and controls to the helicopter’s systems.
Finally, the seats and safety harnesses can be installed to ensure that the pilot and any passengers are secure during flight. Building the cockpit of a home-built helicopter is a challenging but rewarding process that requires attention to detail, skill, and safety.
14. Building the engine and transmission
Building the engine and transmission of a home-built helicopter can be a challenging but rewarding experience for aviation enthusiasts.
Before starting the construction, it is important to determine the power requirements and select an appropriate engine. This could be a traditional gasoline or diesel engine or a modern electric motor.
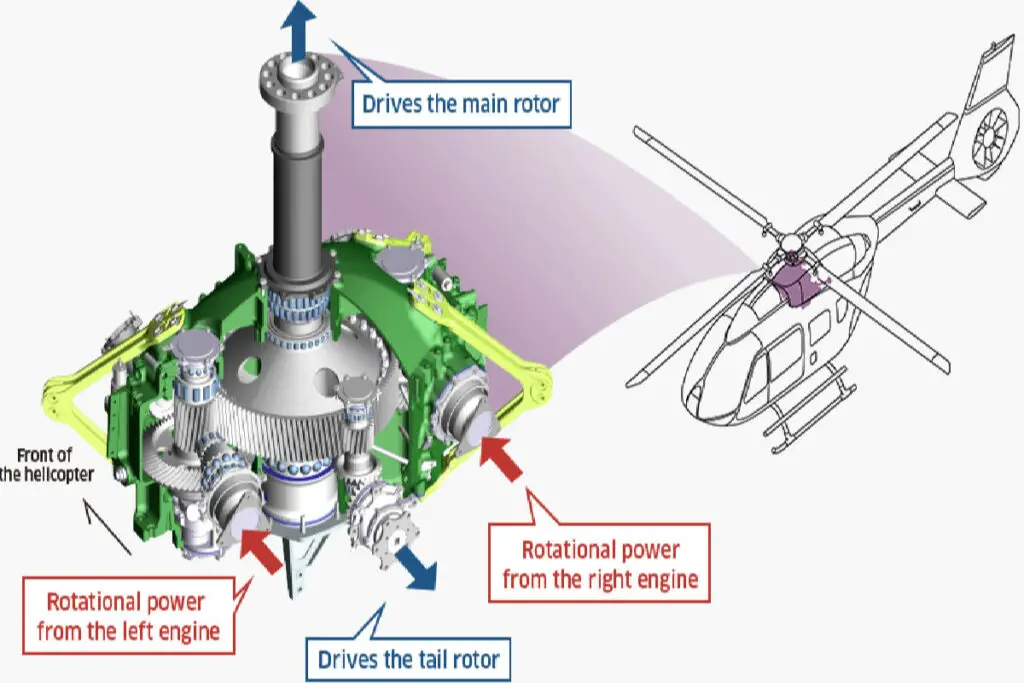
Once the engine is selected, attention turns to the transmission. A helicopter’s transmission is a complex component that transfers the power from the engine to the rotor blades, and includes a gearbox, shafts, and other related parts.
The transmission needs to be lightweight, strong, and durable to withstand the rigors of flight. Building the engine and transmission of a home-built helicopter requires specialized knowledge and skills.
It is important to ensure that all components are precisely machined and assembled to exacting specifications. The process may involve working with uncommon terminology and specialized tools, including torque wrenches, micrometers, and dial indicators.
Despite the challenges, building a home-built helicopter can be an immensely satisfying experience. With careful planning, attention to detail, and expert craftsmanship, it is possible to create a flying machine that is safe, reliable, and truly unique.
15. Installing the helicopter landing gear
Installing the landing gear of a home built helicopter requires careful attention to detail to ensure the safe operation of the aircraft. The landing gear serves as a crucial component that supports the weight of the helicopter and helps absorb the impact of landings.
Before beginning the installation process, it is important to ensure that all necessary tools and equipment are readily available. To begin, the helicopter’s manufacturer’s instructions should be followed closely.
The landing gear must be properly aligned with the fuselage and securely attached using appropriate bolts and hardware. The use of lock nuts and safety wire is recommended to prevent loosening during flight.
It is important to note that the size and design of the landing gear will vary depending on the type of helicopter being built. Some home built helicopters utilize skids instead of traditional landing gear, which requires a different installation process.
Overall, installing the landing gear of a home built helicopter is a crucial step in the construction process. By following proper procedures and safety protocols, the aircraft can be safely operated with confidence.
Also see: How Much Does It Cost To Build A Helicopter Hangar?
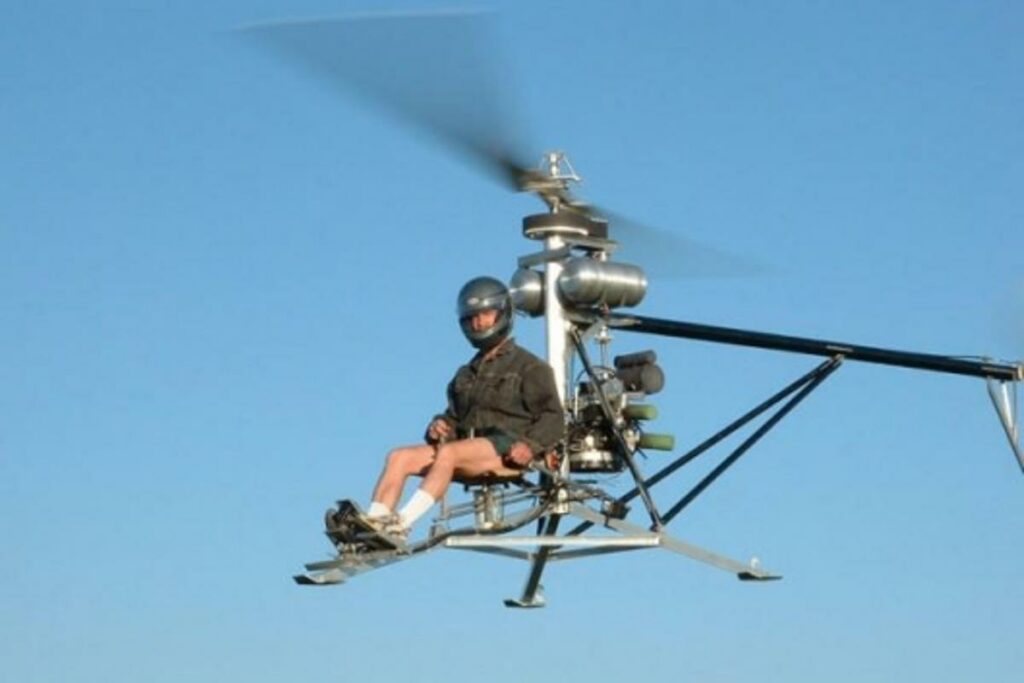
16. Testing and fine-tuning your helicopter
Before flying your homemade helicopter, it is important to conduct ground tests and flight tests to ensure its safety and reliability. You may need to make adjustments and fine-tune the helicopter to achieve optimal performance.
It is also important to ensure that safety measures are in place and to obtain FAA certification before flying your homemade helicopter.
FAQ
1. What are the materials required to build a helicopter at home?
Building a helicopter at home requires extensive expertise, special tools, and expensive materials, making it impractical.
2. Is it legal to build a helicopter at home?
Yes, it is legal to build a helicopter at home as long as you meet certain requirements.
3. How much does it cost to build a helicopter at home?
Building a helicopter at home costs at least $20,000, but can reach up to $500,000.
4. What are the basic steps to follow while building a helicopter at home?
Design, source materials, assemble frame, add engine, rotor, controls, and safety features. Test and iterate.
5. How long does it take to build a helicopter at home?
Building a helicopter at home can take several years, depending on the complexity and expertise.
Conclusion
Building a homemade helicopter is a challenging and rewarding project that can provide a sense of achievement and excitement.
It requires a significant amount of time, effort, and dedication, but with the right tools, knowledge, and resources, it is possible to build a safe, reliable, and functional helicopter.
We hope that this guide has provided you with the information and inspiration you need to take on the challenge of building your own helicopter.
Also see: Building A Homemade Helicopter Step-by-Step


Leave a Reply